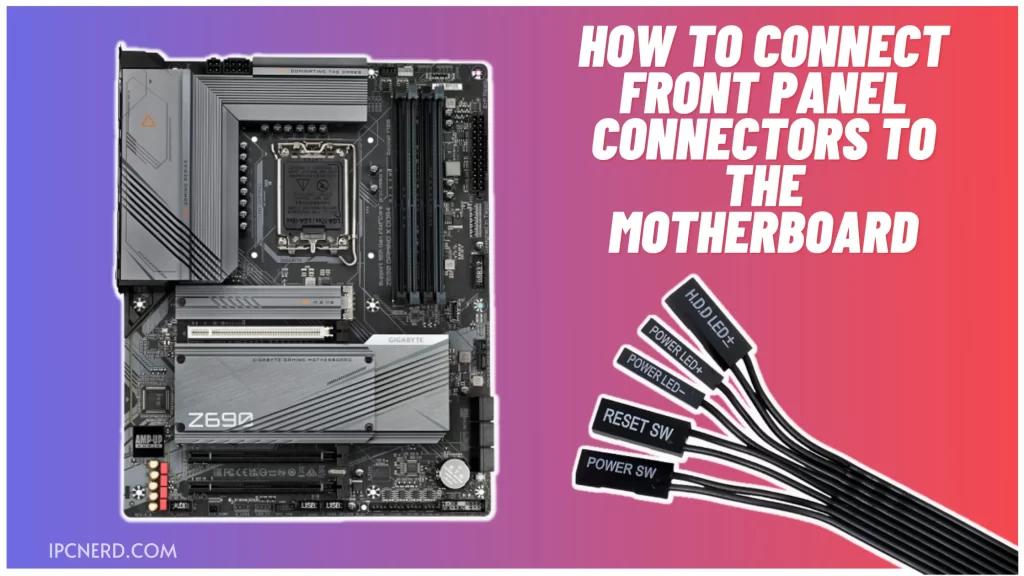
One of the most important steps to building a computer is connecting the front panel connectors to the motherboard.
These connections allow your computer components, including graphics cards and memory, to fit properly into the computer case. Though it’s sometimes a confusing process, this article will walk you through how to do this step-by-step.
- How to connect a front panel connector to the motherboard and each other
- Where do I find the Front Panel Connectors and Motherboard in my Computer?
- Where do I find the Front Panel Connectors and Motherboard in my Computer?
- Best Practices for Connecting a Front Panel Connector to the Motherboard
- Examples of Connecting a Motherboard to a Front Panel
- How to Identify the Front Panel Connector
- Tips Connect Front Panel Connectors to the Motherboard
- Frequently Asked Questions
- Conclusion
How to connect a front panel connector to the motherboard and each other
When you want to connect a front panel connector to the motherboard and each other, follow these steps:
- Loosen the four screws that hold the front panel in place.
- If the connector has a cable attached, disconnect the cable.
- Slide the connector into the hole on the motherboard. Make sure it is seated properly and clips into place with the locking tabs.
- Tighten the screws that were loosened in step 1.
Where do I find the Front Panel Connectors and Motherboard in my Computer?
The front panel connectors are located on the motherboard. To find them, start by looking for the openings in the motherboard that correspond to the CPU, memory, and graphics card slots.
Then, locate the ports on the front panel of your computer. The ports may be labeled “Front Panel Audio Out,” “Front Panel USB 3.0”, or similar.
Next, identify which connector on the front panel corresponds to which port on the motherboard. For example, if you have a USB 3.0 port on your motherboard and a USB 3.0 front panel connector, use that connector to the USB 3.0 port on your computer.
Where do I find the Front Panel Connectors and Motherboard in my Computer?
It can be a little hard to find if you’re looking for the front panel connectors and motherboard in your computer.
The connectors are usually located near the expansion slots on the back of the computer. You’ll need to remove the panel if it’s removable or unscrew the screws that hold it in place.
Once you have access to the connectors, you can plug them into the motherboard. Be sure to match up the cables and plug them into the right ports.
Best Practices for Connecting a Front Panel Connector to the Motherboard
When connecting front panel connectors to the motherboard, it is important to follow proper best practices for secure and correct connections.
To avoid damaging the motherboard or front panel connector, it is important to use the correct connector pins and connectors.
The motherboard has a variety of connectors on the back panel. The most common type of connector is a 24-pin ATX power connector. Other back panel connectors include an 8-pin EPS12V power connector, 4 SATA 6 Gbps ports, 2 USB 3.0 ports, and 2 USB 2.0 ports.
To connect a front panel connector to the motherboard, use the appropriate pin configuration for the connector type and plug the connector into one of the rear panel ports on the motherboard.
To ensure a secure connection, use crimpers or pliers to pinch both ends of the connector so they are firmly attached.
Examples of Connecting a Motherboard to a Front Panel
The motherboard has a variety of connectors that can be connected to the front panel. These connectors include a power supply, audio/video, and USB ports. The following steps outline how to connect these connectors to the motherboard:
- Connect the power supply connector to the power supply.
- Connect the audio/video connector to the video card or other compatible component.
- Connect the USB port to a USB hub or other compatible device.
How to Identify the Front Panel Connector
The front panel connectors are typically found on the back of the motherboard. The connectors are color-coded and have a variety of shapes and sizes. They usually have a label that identifies the connector.
Some connectors, such as PCIe and USB, have multiple versions with different shapes. To identify the version of a connector, you need to look at the shape of the connector and compare it to images or descriptions available online.
Tips Connect Front Panel Connectors to the Motherboard
When you purchase a new motherboard, make sure to connect the front panel connectors to the board. This will allow you to install the motherboard on your computer and access all its features. There are several connector types, so be sure to find the right one for your computer.
Most modern motherboards have several front panel connectors. These connectors include audio jacks, USB ports, and power connectors. You’ll need to connect these connectors to the appropriate pins on the motherboard to use them.
To connect a front panel connector, first, locate the pin on the connector that corresponds with the pin on the motherboard.
Then, use a cable stripper or wire cutter to cut the appropriate length of cable and attach it between the connector and motherboard. Be sure not to short any pins together!
Frequently Asked Questions
What are front panel connectors, and how do they work?
Front panel connectors are the connections between your motherboard and the hardware on your case. They allow you to easily connect the hardware, such as graphics cards, storage devices, and USB ports. Front panel connectors are usually color-coded and have a variety of shapes and sizes.
How do I connect front panel connectors to my motherboard?
Front panel connectors typically have pins that fit into corresponding holes on your motherboard. To connect them, first find the pin layout on your motherboard and match it up with the connector’s markings. Then use a screwdriver to insert the screw into the connector’s corresponding hole on your motherboard and tighten it using a wrench. Finally, plug the other end of the connector into the device you want to connect it to.Â
How do I disconnect the front panel connectors from my motherboard?
Find the pin layout on your motherboard to disconnect a front panel connector and match it up with the connector’s markings. Then use a screwdriver to insert the screw into the connector’s corresponding hole on your motherboard and tighten it using a wrench. Finally, unplug the connector from the device you want to disconnect it.
Conclusion
If you’re like most people, you probably don’t think much about the front panel connectors on your computer.
But if something goes wrong, replacing them can be a real pain. In this article, we have shown you how to connect the front panel connectors on your motherboard so that you can fix problems or upgrade your computer without having to go through the hassle of buying a new one.